When I moved to Dell XPS laptop … YES! It’s absolutely better than Mac-Pro 🙂
I had a serious problem about JDeveloper user interface on Windows 10 which was a UI scale problem.
Problems:
- Oracle JDeveloper (jdev) buttons,icons,menu is too small
- Fonts are too small.
- It’s impossible to develop even “Hello World” 🙂
Environment:
- Windows 10 (x64)
- Java 1.7.080
- JDeveloper 12c (12.1.3) –> Works for other 12c JDeveloper Versions: (12.2.x, 12.1.x)
- Screen Resoultion: 3840×2160 ( 4K )
First Solution (Up to Date – 2021)
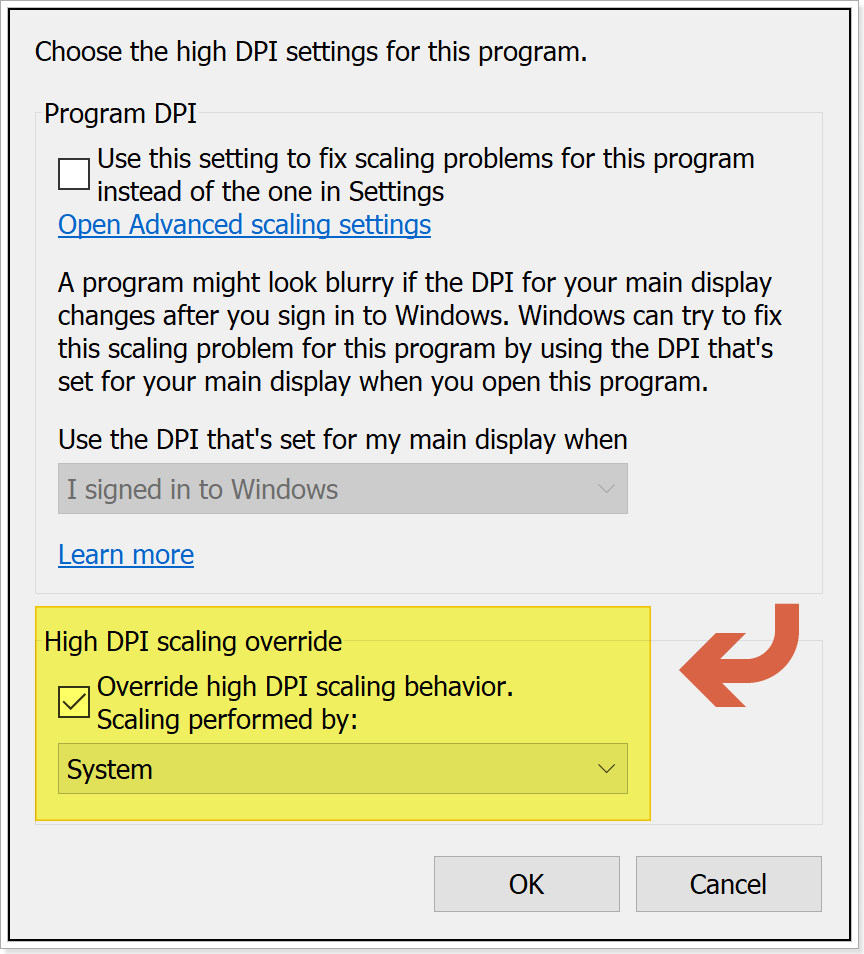
The simple way; Create a shortcut for JDeveloper on desktop then right click on it; Select “Properties” and go to “Compability” tab, find “Change high DPI settings” button at bottom and click on it. Check the option “Override high DPI scaling behavior. Scaling performed by: System”. Finally click OK, click Apply! (Check below screencapture for your reference)
That is it; you are now able to use JDeveloper for your 4K or 2K display. If it is not worked for you try below manual solution. Both worked for me!
Here is the second solution for JDeveloper: (Works for every executable JAVA apps) (Netbeans, Eclipse, JDeveloper, SOAPUI)
Follow below steps to get BEST practice for JDeveloper Screen Quality …Till Oracle Support 4K High Resolution Laptops for JDeveloper 😉
1. Add new registry key to REGEDIT as below:
PATH --> HKEY_LOCAL_MACHINE\SOFTWARE\Microsoft\Windows\CurrentVersion\SideBySide
Select New (Left Click) –> QWORD (64-bit) Value
- Value Name: PreferExternalManifest
- Value Data: 1

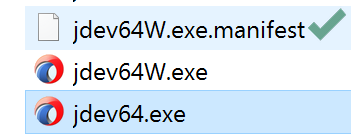
2. Go to JDeveloper installation path and find “jdev64W.exe” file under $MW_HOME\jdeveloper\jdev\bin folder. (My folder path: D:\oracle\MiddlewareSOA12130qs\jdeveloper\jdev\bin\)
3. Create new text file in this folder and name it exactly as “jdev64W.exe.manifest” by changing its extension. (Reference below picture)
4. Edit “jdev64W.exe.manifest” file content as below and save it.
<?xml version="1.0" encoding="UTF-8" standalone="yes"?>
<assembly xmlns="urn:schemas-microsoft-com:asm.v1" manifestVersion="1.0" xmlns:asmv3="urn:schemas-microsoft-com:asm.v3">
<description>eclipse</description>
<trustInfo xmlns="urn:schemas-microsoft-com:asm.v2">
<security>
<requestedPrivileges>
<requestedExecutionLevel xmlns:ms_asmv3="urn:schemas-microsoft-com:asm.v3"
level="asInvoker"
ms_asmv3:uiAccess="false">
</requestedExecutionLevel>
</requestedPrivileges>
</security>
</trustInfo>
<asmv3:application>
<asmv3:windowsSettings xmlns="http://schemas.microsoft.com/SMI/2005/WindowsSettings">
<ms_windowsSettings:dpiAware xmlns:ms_windowsSettings="http://schemas.microsoft.com/SMI/2005/WindowsSettings">false</ms_windowsSettings:dpiAware>
</asmv3:windowsSettings>
</asmv3:application>
</assembly>
5. Edit font sizes:
Go to your $JDEV_USER_DIR\system12.1.3.XXX\o.jdeveloper path and find ide.properties file. (My path: D:\Oracle\MY_JDEV_USER_DIR\system12.1.3.0.41.140521.1008\o.jdeveloper)
Change below font setting parameters from 10 to 14pt. (It’s up to you, but I’ve tested all and I think 14pt is the best ergonomic choice)
Ide.FontSize=14
Ide.FontSize.Aqua=14
6. That’s all. Run JDev by executing “jdev64W.exe” file. (You can create a shortcut on your Desktop)
If you like the solution, please share your thoughts and share the solution with others. Thanks in advance. Keep coding 🙂
BEFORE:
AFTER:
Solution documented for Oracle JDeveloper 12c (by myself).
Contributor and Extender: M.Fevzi Korkutata